Men's Chronograph Watch Setup and Stopwatch Use
A men's chronograph watch is usually set by using the crown for normal time or date adjustment, identifying the pushers and subdials, and then using the model-specific start, stop, and reset sequence for the stopwatch function. Seiko specifies that its 8R46 chronograph measures elapsed time for up to 30 minutes, while the 8R48 measures for up to 12 hours; on both movements, Button A starts and stops timing and Button B resets the stopwatch. These values illustrate why setup, elapsed-time capacity, and control behaviour must be taken from the instruction booklet for the specific movement rather than treated as universal.
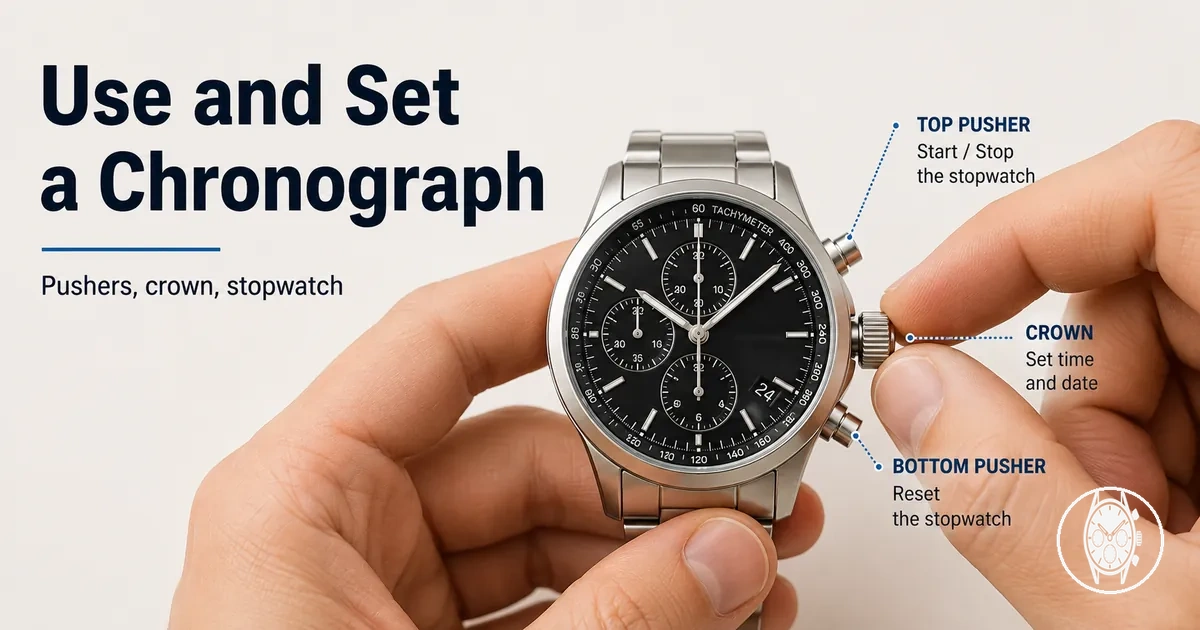
Before using the timing function, identify what the crown, pushers, and subdials do on the watch in front of you.
Before using the timing function, identify what the crown, pushers, and subdials do on the watch in front of you. On Seiko's 8R46 and 8R48 movements, the crown's first-click position sets the date and the second-click position sets the time, while the centre chronograph seconds hand and elapsed-time counters display the stopwatch result; Seiko also states that display position and design can differ by model. That model variation matters across men's chronograph watches, because a crown position or pusher sequence documented for one movement should not be assumed for another.
Safe stopwatch use starts with the display and controls in the required starting state before timing begins.
Safe stopwatch use starts with the display and controls in the required starting state before timing begins. Seiko instructs users of the 8R46 and 8R48 to confirm that the centre stopwatch hand is at the 0 position and to reset it with Button B if necessary; Seiko also specifies that the stopwatch cannot be used when the power-reserve indication is below 10 hours on these movements. In practical terms, confirm zero alignment, identify the relevant elapsed-minutes or elapsed-hours subdials, and check the model's operating condition before pressing a pusher.
In practical terms, confirm zero alignment, identify the relevant elapsed-minutes or elapsed-hours subdials, and check the model's operating condition before pressing a pusher.
A normal reset and recalibration are different actions: reset returns a correctly aligned chronograph display to its zero reference after timing, while recalibration corrects a hand that remains misaligned after reset. Citizen specifies for its B620 movement that correcting a misaligned chronograph seconds hand requires pulling the crown out two steps, holding the upper-right button for 2 seconds, setting the chronograph seconds hand to 0 seconds, pushing the crown back in, and completing the process with the lower-right button. Use the specific instruction booklet when reset does not restore zero alignment, because that recalibration sequence is movement-specific rather than a general chronograph procedure.
Table of Contents
Chronograph Controls and Dial Parts Needed Before Use
The controls and dial parts to identify before using a chronograph watch are the watch case, crown, pushers, main hands, chronograph seconds hand, running seconds display, and elapsed-time subdials. These parts have distinct functions: the crown handles assigned setting functions, the pushers operate assigned chronograph actions, the main hands show normal time, and the chronograph displays show running seconds or measured elapsed time according to the watch's documented layout.
The 8R46 records up to 30 minutes of elapsed time, whereas the 8R48 records up to 12 hours, illustrating how the available dial counters and timing range change with the movement.
Identify the crown, pushers, main hands, and subdials before starting the stopwatch because their assigned functions determine which control starts, stops, or resets timing and which display records elapsed time. Seiko specifies for its 8R46 and 8R48 movements that Button A starts and stops the stopwatch and Button B resets it; Seiko also identifies a centre stopwatch seconds hand and a stopwatch minute hand on both movements, with an additional stopwatch hour hand on the 8R48. The 8R46 records up to 30 minutes of elapsed time, whereas the 8R48 records up to 12 hours, illustrating how the available dial counters and timing range change with the movement.
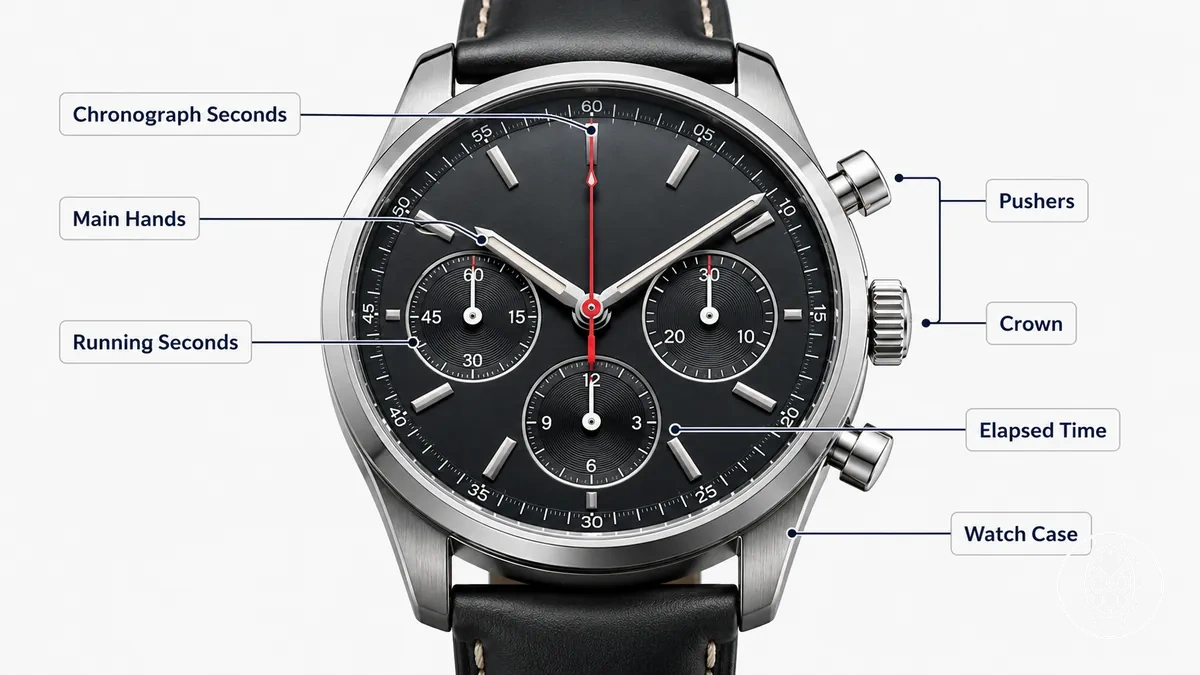
Running seconds and elapsed-time counters should be distinguished by function rather than by subdial position. Rotary specifies for its GB05450/59 Sport Chronograph that the subdial at 6 o'clock shows running seconds, the subdial at 9 o'clock records elapsed minutes, the subdial at 3 o'clock displays 24-hour time, and the main chronograph seconds hand records elapsed seconds; for example, an elapsed-minute counter at 4 minutes with the chronograph seconds hand at 8 seconds represents an illustrative elapsed time of 4 minutes 8 seconds. Detailed chronograph functions and subdials should therefore be matched to the markings and instruction booklet for the specific watch rather than inferred from subdial position alone.
Running seconds and elapsed-time counters should be distinguished by function rather than by subdial position.
The watch case carries the crown, pushers, and dial displays, but model variation means their detailed arrangement and operating relationship are not a guaranteed layout across chronographs. The practical boundary before use is to identify each visible control and display from the instruction booklet; the underlying relationship between those parts belongs to how chronograph watches work rather than this control-identification overview.
Pushers, Crown, Main Hands, and Chronograph Hands
The upper pusher, lower pusher, crown, main hands, and chronograph hands are the local control and display points for setting and operating a chronograph watch: the pushers control assigned stopwatch actions, the crown provides normal and setting positions, the main hands show current time, and the chronograph hands show elapsed time. Citizen specifies for movement 0510 that the crown must be fully pushed in for chronograph operation, the upper-right pusher starts or stops timing, and the lower-right pusher resets the chronograph when it is stopped; these assignments are model-specific rather than a universal pusher layout.
Before you press a pusher or pull the crown, check its documented position and function.
Before you press a pusher or pull the crown, check its documented position and function. For example, Seiko specifies for movements 8R46 and 8R48 that the crown has three operating positions: normal for manual winding, first click for date setting, and second click for time setting; Seiko assigns Button A to start and stop timing and Button B to reset the stopwatch.
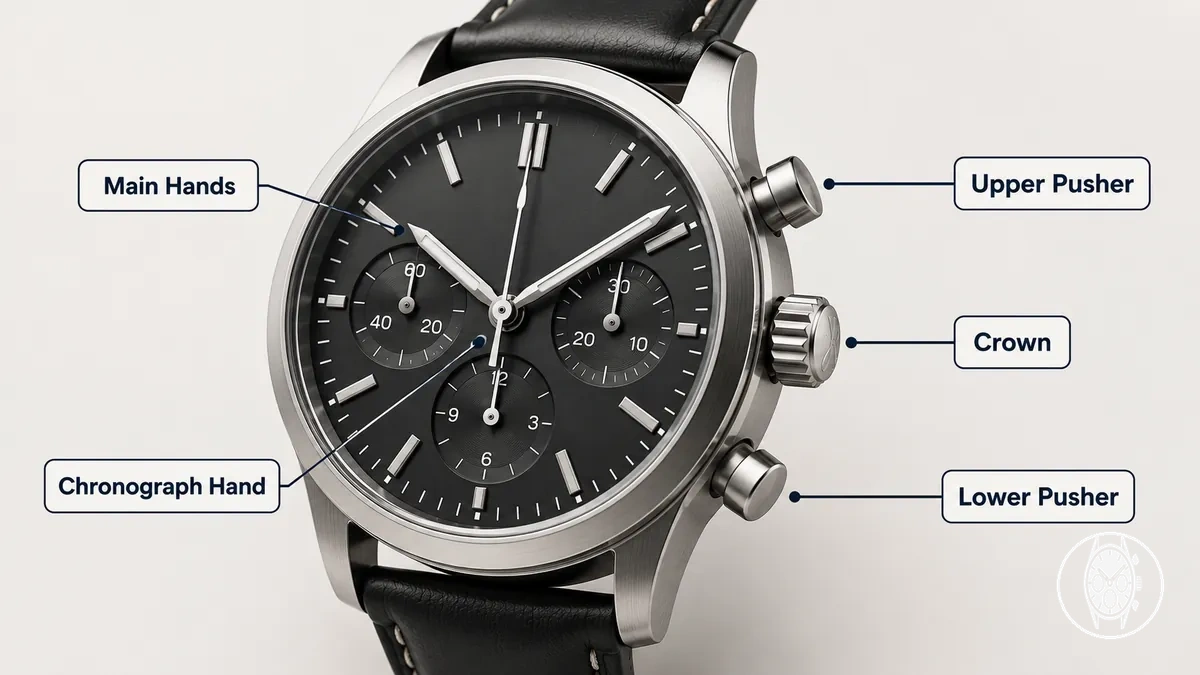
- Upper pusher: On the Citizen 0510 layout, press and release the upper-right pusher to start or stop timing. Check the model instructions before pressing because the upper pusher's assigned action is not universal.
- Lower pusher: Citizen specifies that the 0510 lower-right pusher resets the chronograph when it is stopped. Resetting in this documented stopped condition returns the stopwatch display for the next measurement.
- Crown: The crown changes function according to its setting position. On Seiko 8R46 and 8R48, the normal position is for manual winding, the first pulled position sets the date, and the second pulled position sets the time; Seiko instructs users not to pull the crown for time or date setting while the stopwatch is operating.
- Main hands: The main hour and minute hands display current time rather than measured elapsed time. Citizen specifies that movement 0510 continues to display normal time while its chronograph is operating, so the time hands remain separate from the stopwatch display.
- Chronograph hands: The chronograph hands display elapsed time. Seiko identifies a centre stopwatch seconds hand and a stopwatch minute hand on both 8R46 and 8R48, with a stopwatch hour hand on the 8R48; before timing, Seiko specifies that the centre stopwatch hand should be at the 0 position and that Button B resets it to 0 when required.
Subdials for Running Seconds and Elapsed Time
Chronograph subdials can display either normal timekeeping information or elapsed-time counters, and their value is determined by the markings, scale, and movement layout rather than by subdial position alone. Seiko's 8R46 and 8R48 instructions illustrate this distinction: both identify a small seconds hand for normal timekeeping and a 30-minute stopwatch minute counter, while the 8R48 also has a 12-hour stopwatch hour counter.
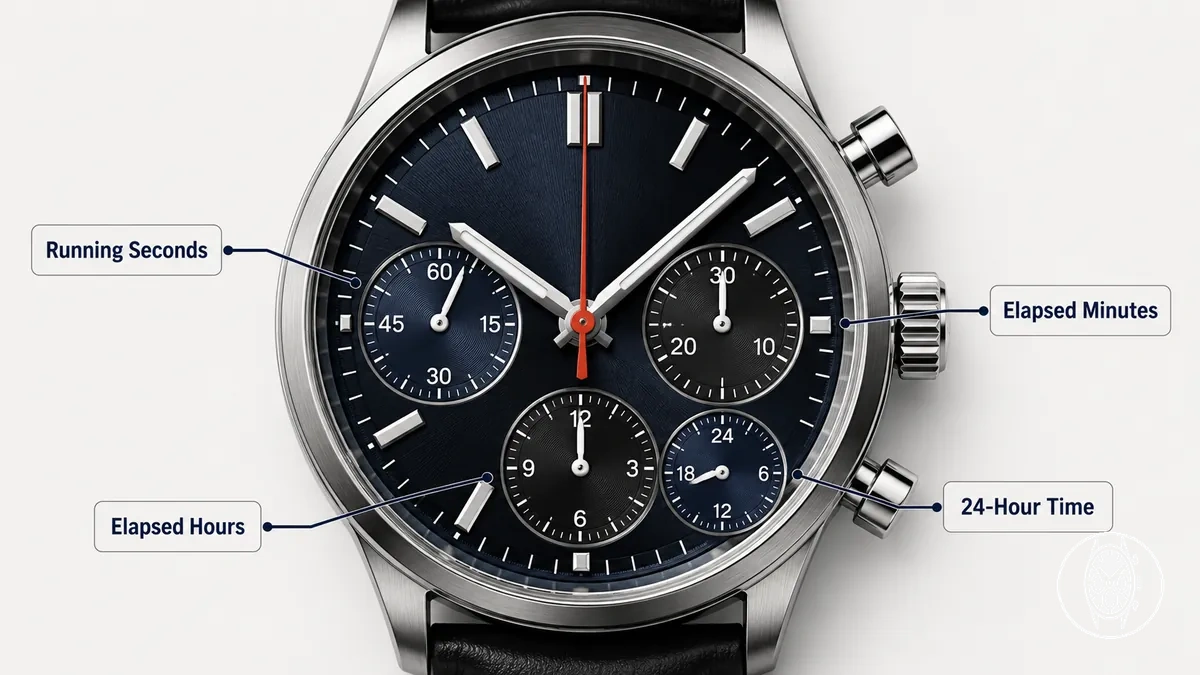
Read a subdial by matching its markings and scale to the value being displayed, then confirm that interpretation against the movement instructions. Seiko specifies a 30-minute elapsed-time capacity for the 8R46 and a 12-hour capacity for the 8R48, showing why the available counters and timing range depend on movement layout. A dial marked from 0 to 30 can therefore serve as an elapsed-minutes counter on a documented chronograph layout, while a 24-hour indicator represents time across a 24-hour cycle when the movement assigns it that function rather than stopwatch timing.
| Subdial function | Label or scale | Value shown | User interpretation |
|---|---|---|---|
| Running seconds | Seconds markings | 0–60 seconds per minute | Read as the continuous seconds of normal timekeeping, not accumulated elapsed time. |
| Elapsed minutes | Movement-specific minute scale; 0–30 on Seiko 8R46 and 8R48 | Up to 30 elapsed minutes per counter cycle on these movements | Read with the stopwatch function; Seiko specifies a 30-minute stopwatch minute counter for both movements. |
| Elapsed hours | Movement-specific hour scale; 0–12 on Seiko 8R48 | Up to 12 elapsed hours on the 8R48 | Use the hour counter for longer timing when the movement includes one; Seiko specifies this counter for the 8R48 but not the 8R46. |
| 24-hour indicator | 24-hour scale | Hour within a 24-hour day | Interpret it as AM-or-PM time-of-day information when documented for that movement, not automatically as elapsed stopwatch hours. |
Contrast: Running seconds belong to normal timekeeping and continue independently of stopwatch measurement, whereas elapsed minutes and elapsed hours are chronograph counters that accumulate elapsed time while the stopwatch operates. Because the markings and movement layout determine those assignments, confirm each small dial before timing; the broader distinction is covered under chronograph functions and subdials.
How to Set the Time and Date on a Chronograph Watch
To set the time and date on a chronograph watch, normally use the crown for time setting and date setting, while the pushers operate the stopwatch function rather than normal time setting. Seiko specifies for its 8R46 and 8R48 movements that the first pulled position is used for date setting, the second pulled position is used for time setting, and the pushed-in position is the normal crown position; these setting positions are model-specific.
Check the instruction booklet before selecting a crown position because another chronograph can use different pulled positions, rotation directions, or date-setting procedures.
Check the instruction booklet before selecting a crown position because another chronograph can use different pulled positions, rotation directions, or date-setting procedures. On Seiko 8R46 and 8R48 models with a screw-down crown, Seiko specifies that the crown must be unlocked before operation and secured again afterward; Seiko also states that the date changes around midnight when AM or PM is set correctly.
Use the following sequence as a model-specific example of crown-based setup.
Use the following sequence as a model-specific example of crown-based setup. The Seiko 8R46 and 8R48 instructions support the crown positions and adjustment sequence below; if the watch uses different setting positions, a different date window, or a different screw-down crown procedure, follow its instruction booklet instead.
- Prepare the watch: If the chronograph has a screw-down crown, unlock it according to the model instructions before pulling it outward. Leave the pushers unused because this procedure concerns normal time and date setup rather than stopwatch operation.
- Select the date-setting crown position: On Seiko 8R46 and 8R48 movements, pull the crown to the first click and turn it counterclockwise until the previous day's date appears; for example, Seiko instructs setting the date to 5 when the intended calendar date is 6.
- Set the time and hand alignment: On these Seiko movements, pull the crown to the second click when the small seconds hand reaches the 12 o'clock position; the small seconds hand stops in that position. Turn the crown to advance the hour and minute hands through the date change and then to the required time.
- Confirm AM or PM and the date: Seiko specifies that advancing the hands until the date changes establishes the AM period on the 8R46 and 8R48. Continue to the required time with the correct AM or PM relationship so the calendar changes around midnight rather than around noon.
- Return the crown: Push the crown back to the normal pushed-in position in accordance with a time signal so normal timekeeping resumes. If the model has a screw-down crown, secure it according to the instruction booklet after completing the adjustment.
- Confirm normal timekeeping: Check that the hour and minute hands show the intended time, the small seconds hand is moving, and the date window shows the intended calendar date when the watch includes one.
Setup check: Confirm four states before finishing: the crown is in its normal pushed-in position, the hands show the intended time, the AM or PM relationship produces the intended date change, and the date window shows the correct date when present. If the chronograph uses a screw-down crown, also confirm that it has been secured according to the model-specific instruction booklet.
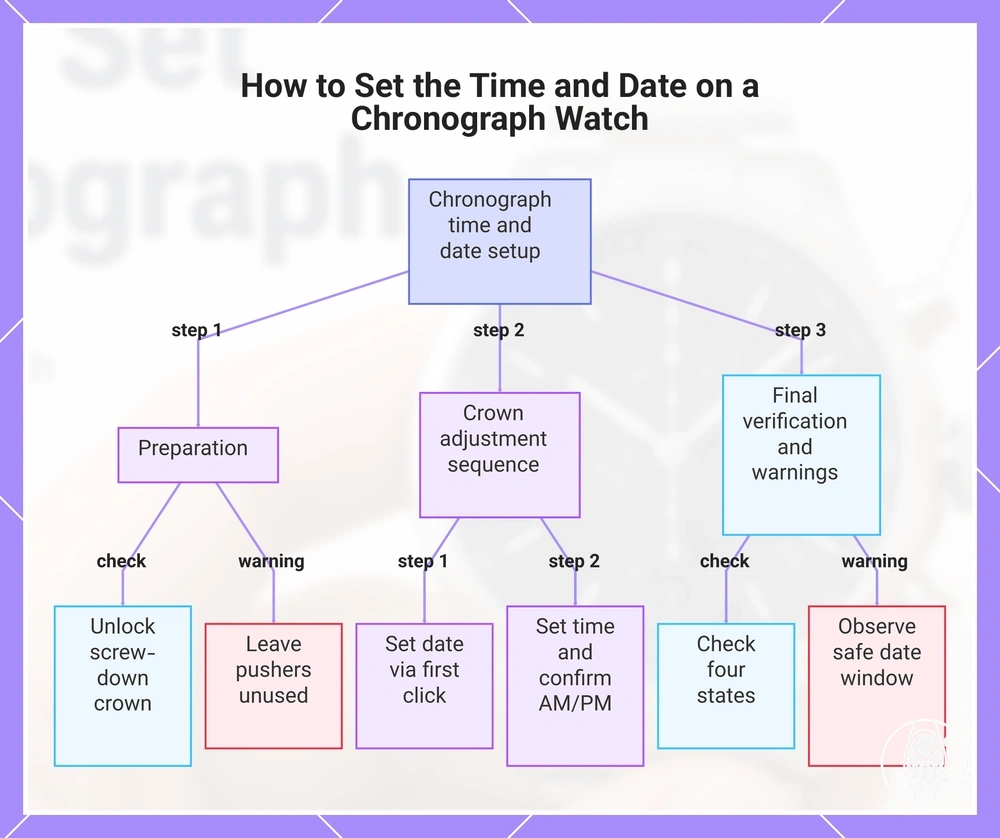
This chart outlines the key steps and warnings for setting the time and date on a chronograph watch, using a Seiko 8R46/8R48 example.
This chart outlines the key steps and warnings for setting the time and date on a chronograph watch, using a Seiko 8R46/8R48 example.
How to Prepare the Chronograph Before Timing
Prepare a chronograph before timing by confirming zero alignment, pusher function, crown position, running status, and model-specific restrictions so the stopwatch begins from its documented ready state and the elapsed-time reading is not taken from an incorrect start point. Seiko specifies for its 8R46 and 8R48 movements that the centre stopwatch seconds hand should be at the 0 position before timing and that Button B returns the stopwatch to 0 when reset is required.
Seiko specifies for its 8R46 and 8R48 movements that the centre stopwatch seconds hand should be at the 0 position before timing and that Button B returns the stopwatch to 0 when reset is required.
Check the controls and operating conditions before starting measurement: identify the documented start, stop, and reset pushers, confirm the required crown position, and verify that the chronograph is stopped and ready for reset when the model requires it. Seiko specifies Button A for start and stop and Button B for reset on the 8R46 and 8R48, and states that their stopwatch cannot operate when the indicated power reserve is below 10 hours; begin timing only after the display and controls meet the model's documented readiness conditions.
- Zero alignment: If the chronograph is stopped, check whether its stopwatch hand is at the zero marker; on Seiko 8R46 and 8R48 movements, use Button B to reset the centre stopwatch seconds hand to 0 when required. A confirmed zero start point prevents the next elapsed-time reading from beginning with a visible offset.
- Pusher function: Before pressing a control, identify which pusher performs start, stop, and reset on the specific movement. Seiko assigns start and stop to Button A and reset to Button B on the 8R46 and 8R48; using the documented pusher function avoids applying that model-specific sequence to a different layout.
- Crown position: Check that the crown is in the documented operating position before timing. Citizen specifies crown position 0, the normal pushed-in position, for chronograph operation on its H50 movement; pulling the crown to position 1 or 2 while measuring elapsed time stops and resets that chronograph, so timing should begin only with the crown returned to position 0.
- Running status: If a reset is needed, first check whether the movement requires the chronograph to be stopped. Citizen specifies for its E210 movement that pressing Button B while the chronograph is stopped resets the chronograph hands to the 0 position; confirming the stopped state therefore establishes the documented reset condition before a new measurement.
- Water or impact context: If the watch is wet, underwater, or has received a strong impact, check the model instructions and hand positions before operating the pushers. Seiko instructs users of 8R46 and 8R48 watches not to operate the buttons when the watch is wet or underwater, while Citizen states that a strong shock can move the H50 chronograph minute hand away from its 0 position; in either condition, postpone timing until the applicable restriction or alignment check is resolved.
- Model-specific restrictions: Verify any power or operating threshold stated for the movement before timing. Seiko specifies that the 8R46 and 8R48 stopwatch cannot operate below an indicated power reserve of 10 hours, so an indication below that threshold means the stopwatch is not ready for elapsed-time measurement.
If the chronograph hand is not at zero before timing, apply the ordinary reset procedure specified for that movement first; if the hand returns to zero, the display has regained its intended start point, while persistent misalignment can require a separate reference-position or recalibration procedure rather than repeated or forced pusher operation. Citizen's H50 instructions distinguish normal chronograph reset from adjustment when the chronograph seconds hand does not return to 0, which marks the boundary between this preparation check and resetting a chronograph watch.
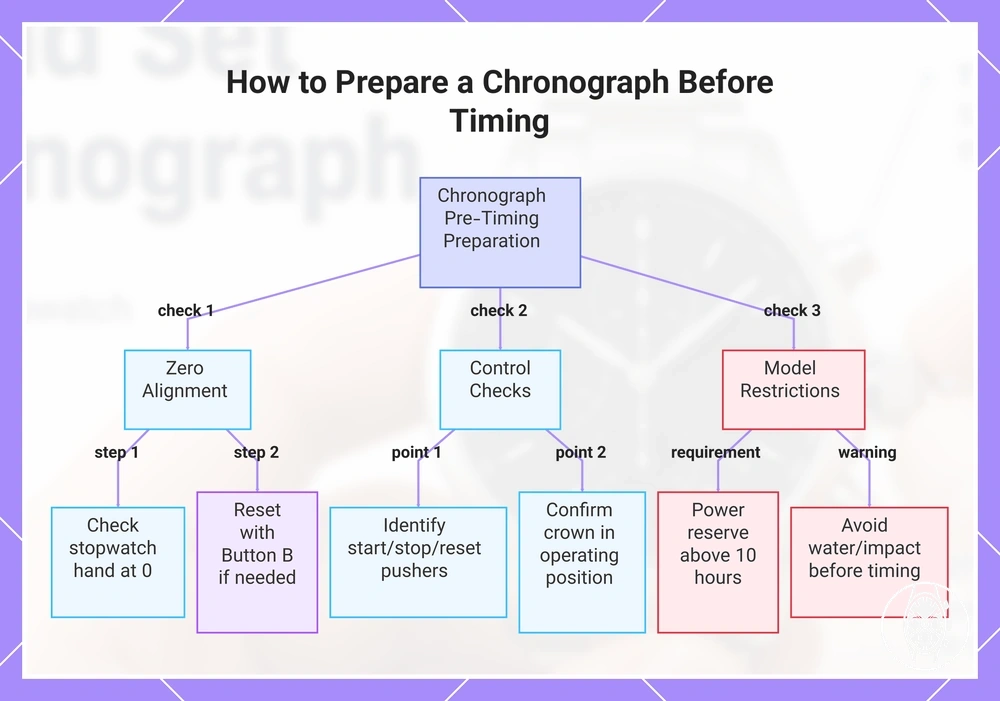
This chart shows the key checks and steps to prepare a chronograph before starting elapsed-time measurement, including zero alignment, control verification, and model-specific restrictions.
This chart shows the key checks and steps to prepare a chronograph before starting elapsed-time measurement, including zero alignment, control verification, and model-specific restrictions.
Checking the Stopwatch Hand Is at Zero
Before timing begins, the stopwatch hand or central chronograph seconds hand should align with its zero marker so the elapsed-time reading starts from the intended reference point. Seiko specifies for its V172, V174, V175, and V176 chronographs that the stopwatch seconds hand's preliminary position is 0 seconds, while a hand that does not return to that position after normal reset requires a separate alignment procedure.
- Identify the hand: Check the central chronograph seconds hand rather than the running-seconds hand used for normal timekeeping. The expected ready state is alignment with the stopwatch's zero marker.
- Check the zero marker: With timing stopped, look at the chronograph seconds hand's reference point. If the hand indicates 0 seconds, zero alignment is confirmed and the next action is to begin timing when required.
- Check the reset response: If the stopwatch hand is away from zero after a timing run, use the movement's normal reset command only with timing stopped when the instruction booklet specifies that condition. A reset response that returns the hand to 0 seconds restores the intended start point for the next elapsed-time reading.
- Choose the next action: If normal reset leaves the chronograph seconds hand persistently away from 0 seconds, stop the ordinary-use sequence and follow the movement-specific reference-position procedure. Seiko's V176 instructions, for example, separate normal reset from preliminary-position adjustment of the stopwatch second hand to 0 seconds.
Persistent misalignment belongs to recalibration rather than routine stopwatch use, so follow the movement-specific procedure for resetting a chronograph watch instead of repeating the reset command or assuming the hand is damaged.
Confirming Which Pusher Starts, Stops, and Resets
Before an important timing task, confirm each pusher's start, stop, and reset role with a short test so an unexpected stopwatch response does not cause mis-timing or an accidental reset. Citizen specifies for movement 0510 that, with the crown fully pushed in, the upper pusher starts and stops the chronograph, while the lower pusher resets it when timing is stopped; this press condition and control assignment are movement-specific.
Before an important timing task, confirm each pusher's start, stop, and reset role with a short test so an unexpected stopwatch response does not cause mis-timing or an accidental reset.
For a practical test, press the documented start control and confirm that elapsed-time measurement begins, press the documented stop control and confirm that the displayed time holds, then test reset only after the stopwatch has stopped. On Citizen 0510, the sequence is upper pusher to start, upper pusher to stop, and lower pusher to reset; if a pusher produces a different response or resists normal operation, stop the test and check the instruction booklet before using the watch for the timing task.
| Pusher | Press condition | Stopwatch response | Safe use outcome |
|---|---|---|---|
| Upper pusher | Citizen 0510 chronograph stopped and ready | First press starts timing; the next press stops timing | Confirm that the upper pusher starts and stops as documented before measuring the important event. |
| Lower pusher | Citizen 0510 timing stopped | Press resets the chronograph display to its zero position | Confirm zero alignment before beginning the next measurement. |
How to Start, Stop, and Reset the Stopwatch Function
To use a chronograph stopwatch function, the typical sequence is to press the designated pusher to start timing, press it again to stop, read the elapsed time on the display, and press the designated reset pusher after timing has stopped. Seiko specifies for its 5X83 movement that Button A starts and stops the stopwatch and Button B resets it, so this control assignment is a model-specific example rather than a universal pusher layout.
Use reset from the stopped state when the movement instructions require it, because resetting clears the measured elapsed time and returns the stopwatch display toward its documented zero state.
Use reset from the stopped state when the movement instructions require it, because resetting clears the measured elapsed time and returns the stopwatch display toward its documented zero state. Seiko specifies for the 5X83 that if the stopwatch hands are moving, Button A is used to stop them before Button B resets them; the movement also supports restart and stop actions for accumulated elapsed-time measurement.
- Confirm readiness: Check that the chronograph stopwatch is ready for a new measurement and its hands show the documented starting state. For Seiko 5X83, the stopwatch 1/20-second and seconds hands return to the 0-second position before a new timing sequence.
- Start timing: Press the documented start pusher once. On Seiko 5X83, pressing Button A starts the stopwatch function and the chronograph display begins recording elapsed time.
- Stop timing: Press the documented stop pusher when the measured event ends. On Seiko 5X83, pressing Button A again stops the stopwatch and leaves the measured elapsed time on the display for reading.
- Read or resume if supported: Read the elapsed time while the stopwatch is stopped; if cumulative timing is supported, use the documented start pusher to resume from the accumulated value. Seiko specifies that start and stop can be repeated on the 5X83 for accumulated elapsed-time measurement.
- Reset after stopping: Once timing is stopped and the elapsed time has been read, press the documented reset pusher. Seiko specifies Button B for reset on the 5X83, returning the stopwatch hands to their documented zero positions for the next measurement.
- Confirm return to zero: Check the display before beginning another measurement. If a pusher has abnormal resistance or does not produce the documented display response, stop pressing it and consult the watch's instruction manual rather than applying greater force.
For an illustrative 45-second timing scenario, start the stopwatch at 0 seconds, stop it when the event ends at 45 seconds, read the 45-second elapsed time while the display is stopped, and then reset it. The 45-second value is hypothetical rather than a Seiko 5X83 specification; it demonstrates why the elapsed-time reading should be taken before the reset command clears the measurement.
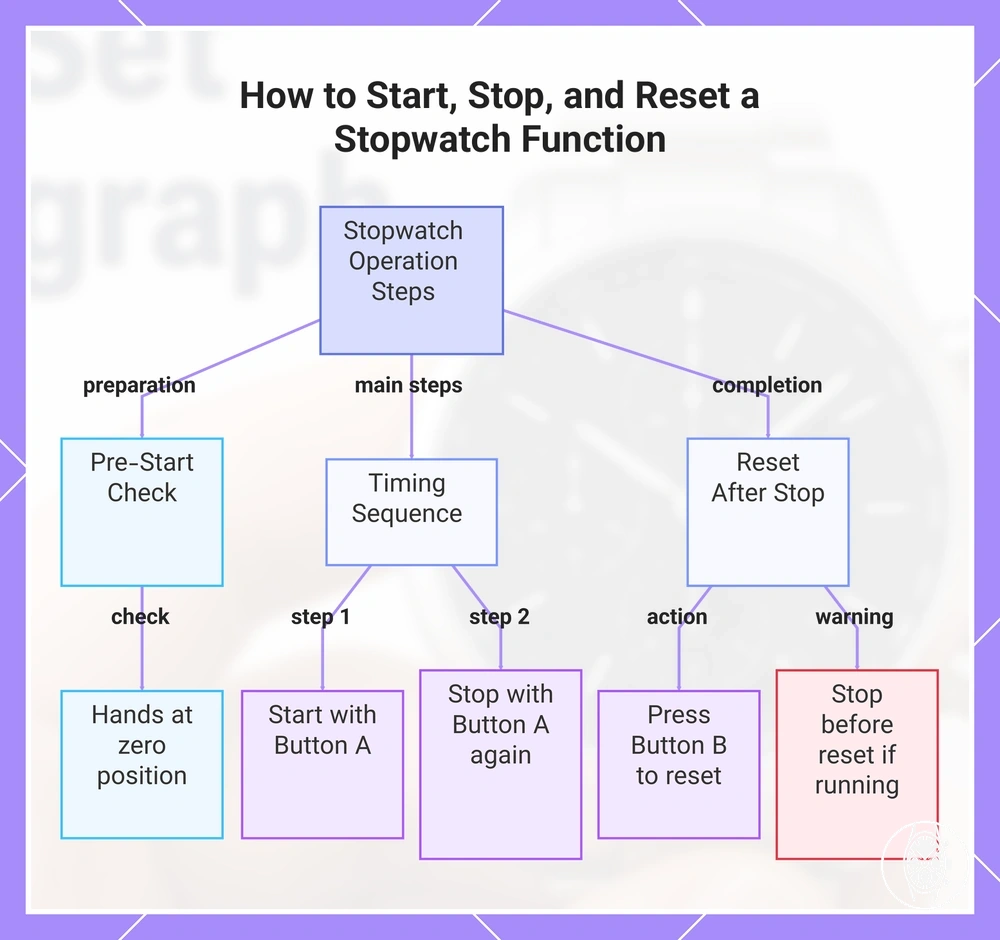
This chart shows the step-by-step sequence for using a chronograph stopwatch, including pre-start checks, timing actions, and reset procedure with a warning about proper order.
How to Read Elapsed Time on Chronograph Subdials
Read elapsed time on a chronograph by combining the chronograph seconds hand with the minute counter and, when the movement includes one, the hour counter; running seconds belong to normal timekeeping and are not part of the stopwatch total. Seiko specifies that its 8R46 movement measures up to 30 minutes with a centre stopwatch seconds hand and stopwatch minute hand, while the 8R48 adds a stopwatch hour hand and measures up to 12 hours.
Use the scale markings and the movement instructions to identify the value shown by each register because the reading condition can change within the timing range.
Use the scale markings and the movement instructions to identify the value shown by each register because the reading condition can change within the timing range. Seiko specifies that the 8R48 minute counter completes one rotation every 30 minutes, so the hour-counter position is used to determine whether the minute indication is read directly or with 30 minutes added.
| Display part | Value shown | Reading condition | Interpretation |
|---|---|---|---|
| Chronograph seconds hand | Elapsed seconds | Read while timing or after the stopwatch has stopped | Combine the indicated seconds with the applicable elapsed-minute and elapsed-hour values. |
| Minute counter | Elapsed minutes | Read according to its scale markings and counter cycle | Seiko specifies a 30-minute stopwatch minute counter on both 8R46 and 8R48; on 8R48, the hour-counter position determines whether 30 minutes must be added. |
| Hour counter | Elapsed hours | Use only when the movement includes an elapsed-hour register | Seiko specifies a stopwatch hour hand with a maximum timing range of 12 hours on 8R48; 8R46 does not include this stopwatch hour hand. |
| Running seconds | Seconds of normal timekeeping | Read as the ordinary seconds display | Do not add running seconds to elapsed time; Seiko identifies the small seconds hand separately from the centre stopwatch seconds hand on 8R46 and 8R48. |
| Scale markings | Graduated values assigned to a hand or register | Match the hand position to the documented scale and counter cycle | The markings determine the value shown for that display part and prevent a stopwatch counter from being confused with a normal-time register. |
| Maximum timing range | 30 minutes on Seiko 8R46; 12 hours on Seiko 8R48 | Manufacturer-stated limits for these two movements | Use the movement's documented limit rather than applying either timing range to another chronograph. |
For a numerical example, Seiko shows an 8R46 elapsed-time reading of 20 minutes 10 seconds by combining the stopwatch minute hand with the centre stopwatch seconds hand. On the 8R48, Seiko shows 6 hours 20 minutes 10 seconds when the minute counter is in the first 30-minute half of the hour, and 6 hours 50 minutes 10 seconds when 30 minutes must be added to the minute indication; these examples show why the hour counter and minute-counter cycle must be read together. The broader distinction between these displays is covered under chronograph functions and subdials.
The broader distinction between these displays is covered under chronograph functions and subdials .
Running-seconds contrast: Rotary specifies for its Sport Chronograph GB05450/59 that the 6 o'clock subdial shows running seconds, the 9 o'clock subdial shows elapsed minutes, and the main chronograph seconds hand shows elapsed seconds. In Rotary's example, a minute counter at 4 minutes and the main chronograph hand at 8 seconds produce an elapsed-time reading of 4 minutes 8 seconds, while the running-seconds subdial is excluded from the calculation.
How to Use a Tachymeter Scale When the Watch Has One
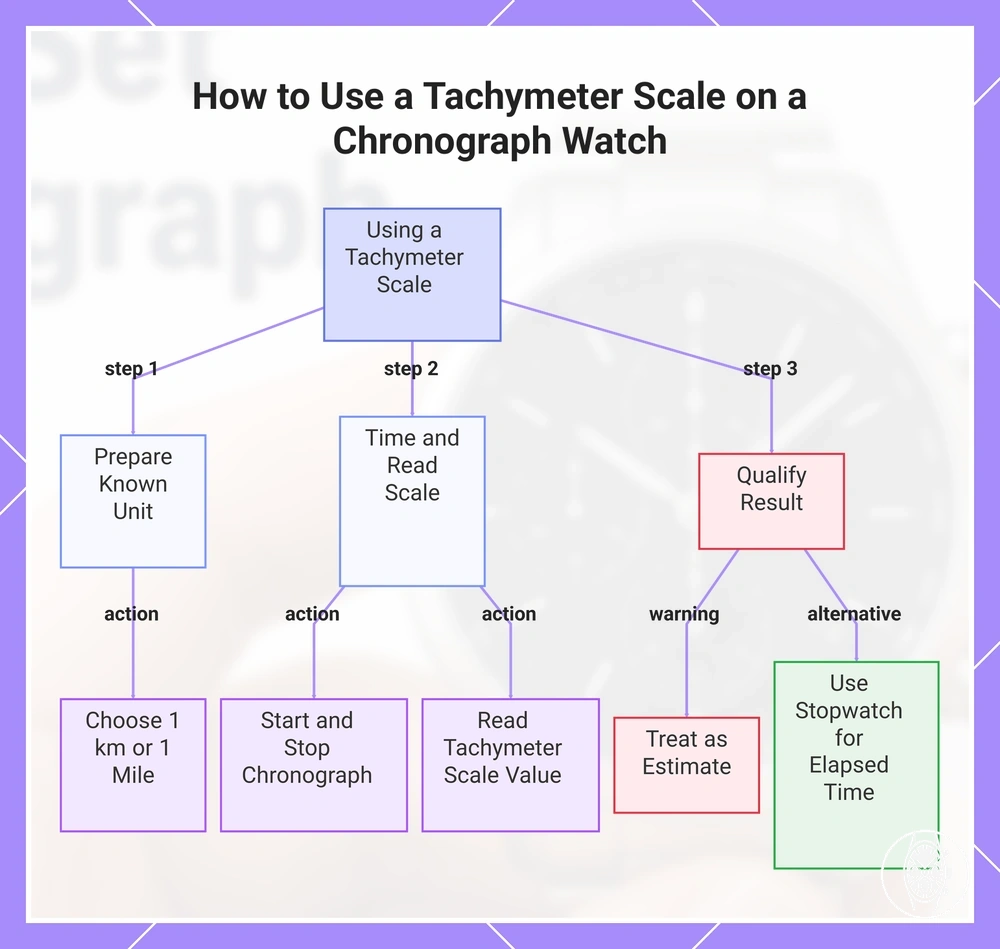
A tachymeter scale converts elapsed seconds over one known unit of measured distance or output into an estimated rate. TAG Heuer explains that if a watch has this scale, timing one known mile or kilometre and reading where the chronograph seconds hand meets the tachymeter markings gives the corresponding rate in units per hour.
A tachymeter scale converts elapsed seconds over one known unit of measured distance or output into an estimated rate.
The tachymeter scale may appear on the bezel or around the dial as a chapter-ring-style scale, but its location and markings are model-specific. The reading is meaningful only when the measured distance or output is known and the start and stop points are timed consistently, so timing accuracy directly affects the estimated rate.
- Choose a known unit: Select one measured unit, such as 1 kilometre or 1 mile. The known unit provides the fixed distance needed for the tachymeter scale to express a rate.
- Start timing: Start the chronograph when the object crosses the beginning of the measured distance. The chronograph seconds hand then records the elapsed seconds for that unit.
- Stop after the unit: Stop timing when the object reaches the end of the measured distance. The stopped chronograph seconds hand preserves the elapsed-seconds value used for the rate reading.
- Read the scale: Read the value on the tachymeter bezel or chapter ring where the chronograph seconds hand points. TAG Heuer explains that this value represents the estimated rate in corresponding units per hour when one unit has been timed.
- Qualify the result: Treat the reading as an estimate because an inaccurate measured distance or an early or late start or stop changes the elapsed-seconds value and therefore the displayed rate. Check the watch instructions if its tachymeter scale uses different markings or operating conditions.
For example, TAG Heuer gives a case in which 1 mile is covered in 30 seconds and the chronograph seconds hand points to 120 on the tachymeter scale, corresponding to an estimated 120 miles per hour. The same one-unit principle applies when the known unit is 1 kilometre, in which case the scale value is interpreted as kilometres per hour.
This chart outlines the steps to estimate speed using a tachymeter scale, including essential qualifications and limitations.
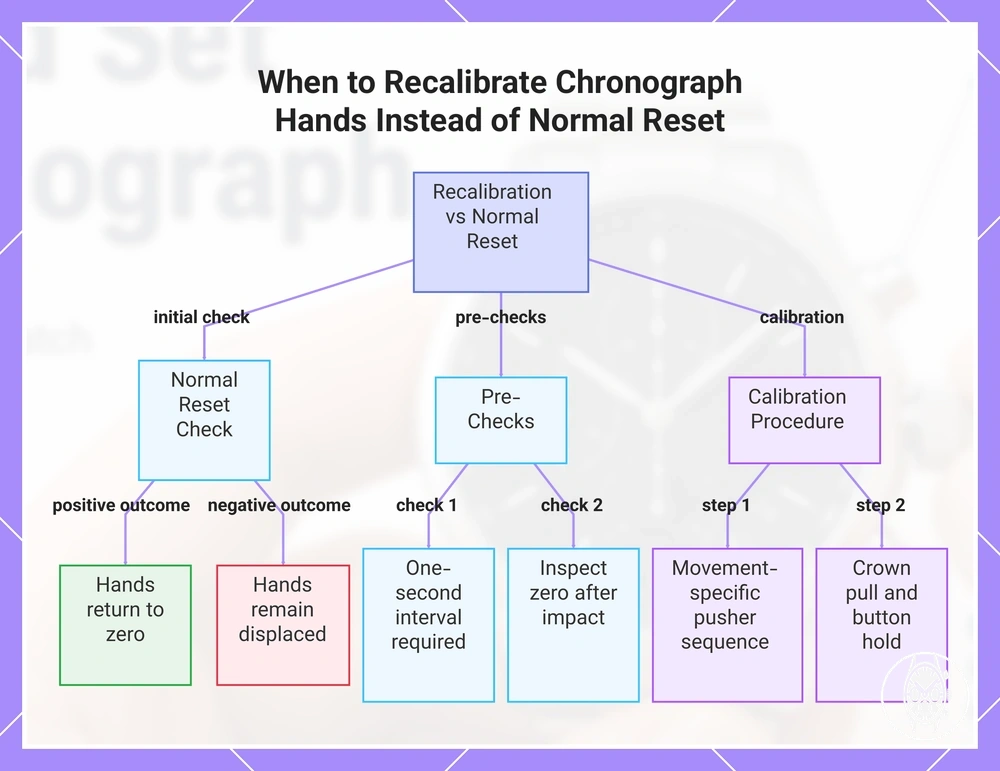
When Chronograph Hands Need Recalibration Instead of Normal Reset
Chronograph hands need recalibration when they fail to return to their specified zero position after a normal reset, rather than simply being stopped away from zero during ordinary timing. Seiko specifies for movements V172, V174 and V175 a preliminary stopwatch position of 0 seconds and 0 minutes, while the V176 uses 00 for the 1/20-second hand plus 0 seconds and 0 minutes; a persistent resting position outside those references indicates that the model-specific hand-alignment procedure should be checked.
A normal reset clears a completed stopwatch measurement, while recalibration realigns a chronograph hand whose reset position remains incorrect.
A normal reset clears a completed stopwatch measurement, while recalibration realigns a chronograph hand whose reset position remains incorrect. Use the documented procedure for resetting a chronograph watch first: if the chronograph hands return to their zero markers, continue normal use; if misalignment remains, use only the calibration mode and pusher sequence specified for that movement.
- Hand position: If the chronograph hands return to the specified zero markers after normal reset, recalibration is not indicated by that check. If they remain displaced, Seiko identifies an incorrect preliminary position on V172, V174, V175 and V176 as a condition requiring position adjustment.
- Normal reset response: Perform the documented reset while the stopwatch is in the required stopped state and observe the result. On Seiko V172, V174 and V175, the reference result is 0 seconds and 0 minutes; on V176, it is 00 for the 1/20-second hand plus 0 seconds and 0 minutes.
- Battery or movement state: Check the watch's battery, charge, or movement state before treating non-operation as misalignment. Seiko states that these solar movements cannot operate the stopwatch while the ordinary seconds hand is moving at two-second intervals; charging until it resumes one-second intervals is the specified condition before continuing the stopwatch check.
- Recent impact: If the watch was recently dropped or struck, perform the documented normal reset and inspect the zero position before entering calibration mode. Seiko states that a strong impact can disturb the preliminary position, and Citizen specifies for movement H50 that a strong shock can move the chronograph minute hand away from 0 minutes.
- Pusher sequence: Use the movement-specific sequence rather than transferring controls from another chronograph. Citizen specifies for movement B620 that the crown is pulled out two steps, the upper-right button is held for 2 seconds, and that button is then used to move the chronograph seconds hand to 0 seconds before the procedure is completed.
- Calibration mode: Enter calibration mode only as specified by the manufacturer. On Seiko V176, the crown is pulled to the second click and Button A is held for 3 seconds to select successive stopwatch hands; Button B then positions the 1/20-second hand at 00, the seconds hand at 0 seconds, and the minute hand at 0 minutes.
These checks separate persistent hand misalignment from broader button, battery, water, or movement-state problems. If the chronograph still behaves abnormally after the documented power, reset, and alignment checks, move to chronograph troubleshooting rather than repeating recalibration as a general solution.
These checks separate persistent hand misalignment from broader button, battery, water, or movement-state problems.
This chart outlines the process to distinguish between a normal reset and the need for recalibration, including the initial reset check, pre-checks, and calibration steps.
Common Setting and Stopwatch-Use Mistakes to Avoid
Common chronograph mistakes involve the timing state, crown position, pusher pressure, water exposure, zero alignment, or model-specific limits; the safer action is to stop and confirm the documented operating condition before continuing. Seiko specifies, for example, that moving stopwatch hands on its 5X83 must be stopped before reset, while its 8R46 and 8R48 movements restrict manual date setting between 8 PM and 2 AM.
These mistakes are preventable use issues rather than proof of a watch fault.
These mistakes are preventable use issues rather than proof of a watch fault. A resistant control, unexpected display response, or unfamiliar dial layout should trigger a check of the crown, pusher lock, timing state, and instruction booklet instead of additional pressure or an assumed control sequence.
- Reset while timing: The risk is using a reset command outside the movement's documented stopped condition. Seiko specifies for the 5X83 that moving stopwatch hands are first stopped with Button A and then reset with Button B; the safer action preserves the intended reset sequence and returns the display to its documented reset state.
- Forcing pushers: Resistance can indicate a locked screw-down pusher or another operating condition rather than a need for greater pressure. Seiko specifies on models with screw-lock pushers that the control must be unlocked before use; the safer action is to stop, check the lock state and instruction booklet, and operate the pusher only when its documented condition is satisfied.
- Date setting at an unsafe time: Changing the calendar during the movement's restricted date-change period can interfere with correct calendar advancement. Seiko specifies an 8 PM to 2 AM restricted date-setting window for movements 8R46 and 8R48; the safer action is to set the date outside that six-hour interval using the documented crown position.
- Using pushers during water exposure: Water resistance does not by itself establish that chronograph pushers are intended to be operated while wet or underwater. Seiko instructs users of applicable screw-lock-button models not to operate the buttons when the watch is wet or underwater; the safer action is to leave the pushers untouched until the documented operating condition is restored.
- Ignoring zero alignment: Starting a measurement with the chronograph hands away from their documented zero position can create an offset in the elapsed-time reading. Seiko specifies for the 5X83 that the stopwatch 1/20-second and seconds hands should return to 0 seconds before a new measurement; the safer action is to confirm the normal reset response and zero alignment first.
- Assuming every dial layout is identical: A pusher, subdial, or hand position on one chronograph should not be assigned the same function on another model without verification. Seiko notes that display orientation and design can differ by model, so the safer action is to match the visible dial layout and controls to the instruction booklet before timing.
- Leaving a screw-down crown unsecured: On a model with a screw-down crown, completing a setting change without returning the crown to its documented secured state leaves setup unfinished. Seiko instructs users of applicable 8R46 and 8R48 models to unlock the crown before adjustment and secure it again afterward; the safer action is to complete that crown sequence before normal use resumes.
If a button problem, battery or movement-state issue, moisture condition, or abnormal reset response remains after these safer checks, move from normal usage guidance to chronograph troubleshooting rather than repeating controls that are not producing the documented response.